Baxter/Yentzer Wedding (Finished & Wedded)
This will be my stab at documenting in the process of creating a dress. Last year Joseph gave me a camera as a present, and that has enabled me to do all of this blogging type stuff. I love my camera!
Okay, to begin; MaritaBeth and I are sharing this wedding order. The dress is for Melanie and David, friends of MB’s from Scarborough fair. MB does absolutely lovely dresses, and I own several of her pieces, but her specialty is Renaissance. It turned out that Melanie wants a Victorian dress, so she can wear it at Dickens on the Strand, too. MB called me in on the project in Jan because my specialty is Victorian, especially bustled dresses. I love it when I get to share projects with MaritaBeth. We work well together, and we have fun.
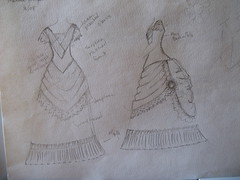
MB and I met with Melanie on Saturday. She brought what fabric she has, and the lace she wants to use. She provided us with a lovely golden-grey cross-weave silk dupioni, (I know the color sounds odd, but think of it as dawn’s first rays of light through fog, simply gorgeous) and ivory venice lace in two sizes. We talked, looked at pictures, played with fabric,…talked… and then I started on the sketch. We changed the skirts midway to reflect a slightly later design trend, and here is the result.
We need to acquire some more fabric and then MB and will dive right in.
I will continue to update this dress diary.
Ok, So as you can see from the sketch this is going to be a simple, but very elegant bustled wedding dress, based around 1875-ish. She wants the ball top for her wedding, which is an evening event, and we will make her a day top later.
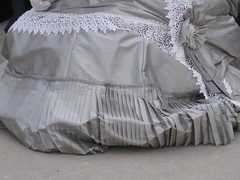
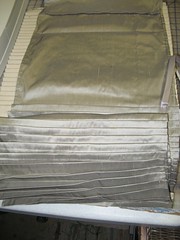 While waiting for the lining fabric to arrive I started on the pleated frill for the base of the underskirt. It eats an amazing amount of fabric to do this. I ended up needing 7 fulls widths of 54″ wide fabric to do this one 14″ deep frill. This first picture is of the pleats in process. You can see my handmade pleater. It makes 1″ pleats with 1/2″ returns.
 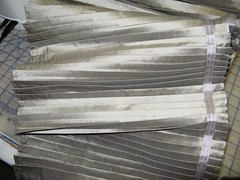 This picture is of the finished mound. I used iron-on hem tape to keep the backs of my pleats together so I could do the entire frill at once. IT is an idea I had at TRF, but did not have the chance to implement. Thanks to MB for reminding me.
After getting the frill all complete, and patterning both the day and evening bodices; I could just not wait anymore. I went ahead and bought some cotton muslin to flat line the skirts. I also needed the net for the bustle pouf.
Her overskirt is a simple draped apron which I flatlined in the cotton, with a great poufed back that is netted to keep it poufy.
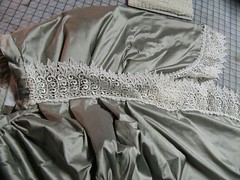 I decorated the edge of the entire skirt in a lovely ivory Venice point lace. This is the only pic I took that day, but you can really see how pretty the lace and silk is with the pleats and drapes.
Next the underskirt. 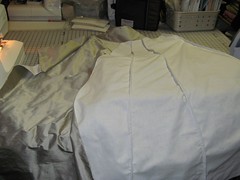 I went ahead and french seamed the entire underskirt. I have never done this before, but I thought it would neaten the seams, and this underskirt will get lots more use than just the wedding. Then on to my favorite part, *eye-rolling* the placement of the pleated frill.
 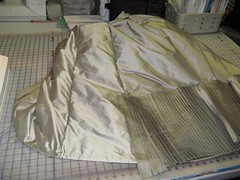 It actually went on really well, except that I was 6″ short in my pleating, my added piece was not the same length as the other end, and I stuck the crap out of myself with a pin and tried to not bleed everywhere! Ugh! -sigh- An oft used saying, “it won’t work if you don’t bleed on it” comes to mind. And here is the onver and underskirt together for the first time.
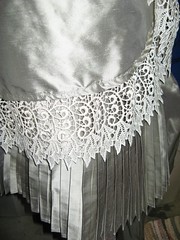
And today we had our fitting. I finished both skirts and her mock-up for the bodice, so here was hoping it all fit.
The front: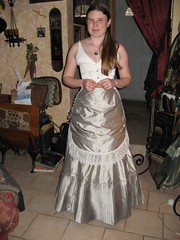 Cute picture with mirror:
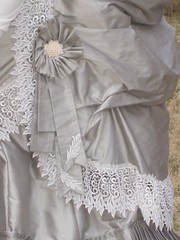
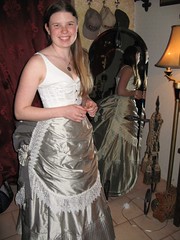 Side with the added rosette.
 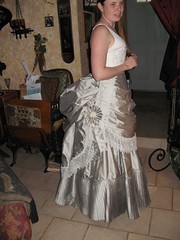 There will be one on each side.
The mock-up has no boning yet, but I am very pleased with how it all fit togther. 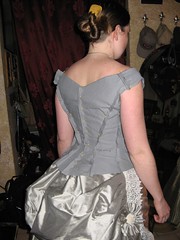 The front fits great as well.
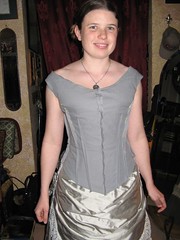
MB and I are very pleased over-all with the fit and the look. I love textural outfits like this. It is fun when the entire dress is mostly one color to see how much visual interest you get, just by adding texture, and adorable little widgets.
The next fitting should be the dress’s dress rehearsal. : ) I will continue to update as the bodice comes together.
Well I meant to update during the bodice creation, but could never remember my camera. -sigh- I will describe it as best I can, though.
First of all we made the bustled petticoat. 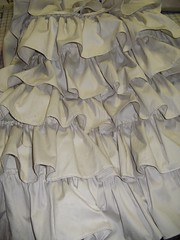
I made the bustled petticoat out of sand colored japanese shirting. It is a lovely cotton with a very subtle woven stripe. I used the same fabric for the lining of the bodice.
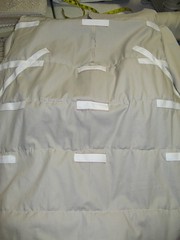
The first pic is all the ruffles for the back of the bustle that cover the bones that are built in. The ruffles help soften the line of the boning. The second pic is the interior of the actual bustle area. I made the bone casings in pieces so it is easier to remove the bones for washing.
The bodice:
Detail front-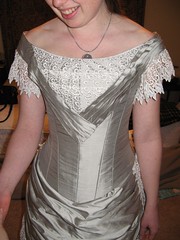
The front of her bodice was one of the most complicated aspects of the entire outfit. First I went ahead and made an entire completed silk bodice, grommets and all. All of the decorative work I had to put on by hand. The center front is the venice lace with the leaf points trimmed off. Over that I set the two bias strips that are rouched at the top and bottom. The rouching was not obvious enough throughout the length, so I went ahead and forced it to pleat between the rouching. I had to invisibly set the pleats, which was a total pain but looks great, and keeps the pleats without any obvious stitching. Also, being cut on the bias that hug the curve of the bust, and accentuate the lace. I like how it appears like a separate lace piece with sleeves worn under the silk; like a swiss waist.
Detail back: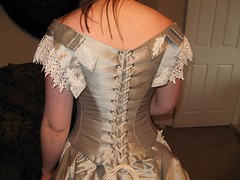
The back of her bodice stumped me for most of this week. She did not want the rouched panels to extend to the grommets, so what, was I going to do for transition. I went through all of my vintage dress pictures, and got the idea for little bows. It took me 45 minutes of screwing around with ribbon strips trying to get a bow that did not overpower the shoulders. This is what I came up with. I am really pleased with outcome. These bows, and the ribbon roses were the only place that I could work in the great little ivory lace appliqués.
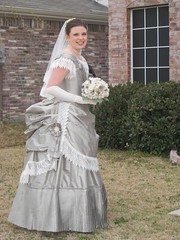
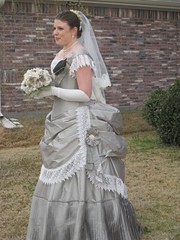
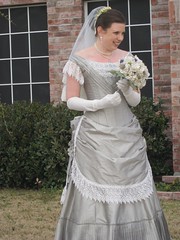
The final fitting went wonderfully, and MB and I are greatly pleased at how flawlessly everything worked. Melanie’s mom is in town now for the wedding so we waited to have this fitting till she was in town to see. Here are the pics of Melanie and her completed dress. MB and I will be her dressers on her wedding day March 8, 2008. Keep checking back, there may be a 4 day wild hair diary to see! *grin*
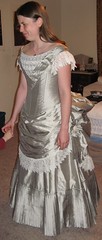
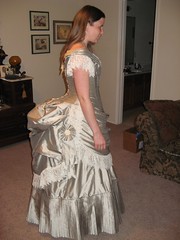
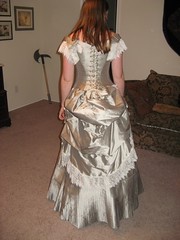
Many thanks to MB’s husband Kyle, who took these pictures for us, since I forgot my camera. ![]()
Here are just a few more pictures from the actual wedding. She had a lovely elbow length veil, and orange blossom head band. The little piece of tartan at her breast, is from her husbands clan, and part of a ceremony symbolizing her addition to the clan through marriage. The maids of honor were in blue/black taffeta skirts which were artfully “bustled” with fitted black velvet tops and cameo brooches. All the groomsman in Scots formal. Everyone looked great. Both MB I are very pleased and proud of how the entire project came together, and the resulting loveliness just makes us happy. Thanks for taking this journey with us. I hope you enjoyed watching us work! *grin*